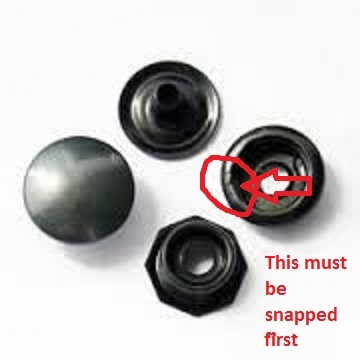
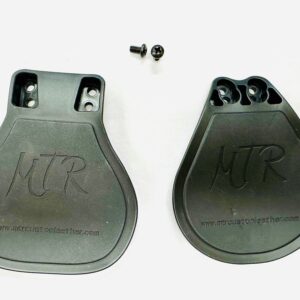
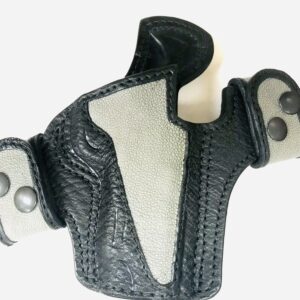
Our product is designed with a heavy duty Military Grade directional snap to ensure a permanent fixture on the belt until you want to unsnap the holster. Directional snaps can only be snapped one way or they could break. The snap must be rocked on at an angle from top to bottom or bottom to top.
A Step-by-Step Guide for Leather Dyeing on Natural Leather
The process for leather dyeing is almost a standard process, anyway it can change in some steps depending on the type of leather dye you’re going to use. To get a quality high-end finish on your natural leather, there are different approaches, especially between water-based leather dyes and alcohol-based leather dyes.
This step-by-step guide will reveal you some tips that will help you get a high-end finish with good color consistency, uniform coating and a smooth surface.
STEP 1:
Pour the paint into a flat container
Water-based leather dye is a liquid with high viscosity, so for a more comfortable use of the paint, we suggest to drop it into a flat container such as a plastic dish or the lid of a bucket. Drop the leather dye into the container and wear gloves before you start the leather dyeing process.
STEP 2:
Apply leather dye with a circular movement
To proceed with the leather dye hand application you can use a sponge, a dauber or a soft cloth. Dip your tool into the paint and start applying it on the natural leather surface with circular movements. During the first application you’ll immediately notice that the paint is quickly absorbed by the leather. You should continue to apply it on the whole leather surface until it will appear completely colored with a uniform coating.
STEP 3:
Let it dry and see the color changing
As you’re using a water-based product the drying phase will be slower that alcohol or solvent-based paint. It should take around 5 to 10 minutes and during this phase you’ll see the color on your leather surface changing and becoming more clear and more bright.
STEP 4:
Repeat the dyeing application by using less quantity
Once the first coat is completely dried you can proceed with the second application. This phase is not strictly necessary but is strongly recommended to give your color more consistency and to have a uniform coating on your leather surface. During the second application you may notice that the paint has more difficulty to penetrate the leather, because a good part is already full of paint.
STEP 5:
Remove the paint in excess before it dries
The paint that is not immediately absorbed by the leather could remain on the leather surface as liquid stripes. It’s very important to remove it before it dries otherwise your leather will not have a uniform aspect. To remove the paint in excess you can easily use the dry part of your sponge or a clean cloth.
STEP 6 (optional):
Use the fixative for extra-bond color
Depending on the type of natural leather you’re using, color may have different bonding. That’s why if you need the color to be well bonded to the leather surface, you can use the leather fixative as final coat.
Front Pocket Holster (B-7) is a very simple yet effective holster for carry of small .380, 9mm and a small snub nose .38/.357. The front pocket design is small sleeve that encases the barrel and trigger guard of the weapon. Allowing easy access to the weapon.The front pocket holster keeps the weapon upright in the pocket. To access the gun easier and prevent the gun from moving around. While keeping the holster and weapon comfortable in the pocket for long term carry!This is also, a great choice for cargo pocket, jacket pocket, purse pocket, vehicle pocket or bedside.
This holster gives you the best of both worlds by offering an inside the waistband (IWB) holster that converts to outside the waistband (OWB) by easily taking off our USA powder coated holster clips. When removed they reveal our molded belts slots for our famous close riding pancake. This holster has become one of our top sellers due to the versatility of having both IWB and OWB capabilities. It’s best to leave the hardware on, once the clips are off. This will help cover the stud that’s embedded into the leather and also prevent you from losing the hardware.
All of our A-2 holster has a custom combat cut for each weapon, this will aid in a faster draw of the weapon. You will also notice that we use heavy duty nylon industrial strength thread to endure great stress on the holster for long term. Don’t forget to checkout our professional slick edges. We use two pieces of leather to construct the holster’s foundation. With our profession slicking technique we conform the two edges into one single slick edge.
Each A-2 is molded specifically to each weapon of choice to sustain a great glove fit retention and detail in the holster. We only use the finest bull hide and hardware on this holster to ensure the longevity and durable wear for years to come. We reinforce the mouth for easy one handed re-holstering and to prevent collapsing while carrying IWB.
This holster by far is a great wearing holster both OWB and IWB. The A-2 is tuckable, so you can tuck your shirt behind the metal clips. The holster clips/belt slots can fit up to 1-1/2 gun belt(2 layer) or 1-3/4 regular belt (1 layer). If you do a loose tuck than the shirt can come back over the metal clips to conceal them.
You can also upgrade to the NEW UltiClips3 to give you better concealment of the clips. Adding the ulticlips will give you the adjustability to position your clips for the perfect draw. Whether it be ride height or adjusting the cant of the holster. With the ulticlips you do not have to wear a belt. You can easily clamp the clips straight onto the pants or any material. Keep in mind if you are going to wear a belt, it will aid in better retention of the holster. Make sure it’s a good stiff heavy gun belt like our GB-1 gun belt.
Recent Comments